Beer Bread

This is another magical recipe in my opinion. It’s the simplest thing to make and comes out very well, even if you use a cheap beer. There is no yeast you need to activate, no special kneading technique employed, and the recipe has a total of six easy-to-find ingredients on the list (if you’re 21 or older, that is). After a friend tried it at a party, he drizzled olive oil, balsamic, and herbs in a dish, and with our combined efforts it made a great party snack! All of the recipes online looked pretty similar, but I went with this one and used the commentators’ suggestions for improvement. The original calls for double the amount of butter and sugar, but using those measurements would have made it oddly sweet and too greasy. It is a bit dense, so remember to sift the flour beforehand so it’s not too tough! If you don’t have a fancy sifter, spooning it into the bowl works.

Prep: 5 minutes
Cook: 50-55 minutes
Yield: one 9×5 inch loaf of bread

Ingredients

  • 3 cups flour
  • 3 tsp baking powder
  • 1 1/2 tsp salt
  • 2 tbsp sugar
  • 12 oz (standard can or bottle size) of beer; a cheap, light beer or cider recommended
  • 1/4 cup butter

Instructions

  1. Preheat oven to 375°F
  2. Whisk together flour, baking powder, salt, and sugar.
  3. Add the beer and mix with a spatula until just combined.
  4. Transfer the dough to a lightly greased loaf pan and pour melted butter over it, making sure to get in the crevices.
  5. Bake for 50-55 minutes, and let cool for about 10 minutes once out of the oven.

Apple Strawberry Oat Bars

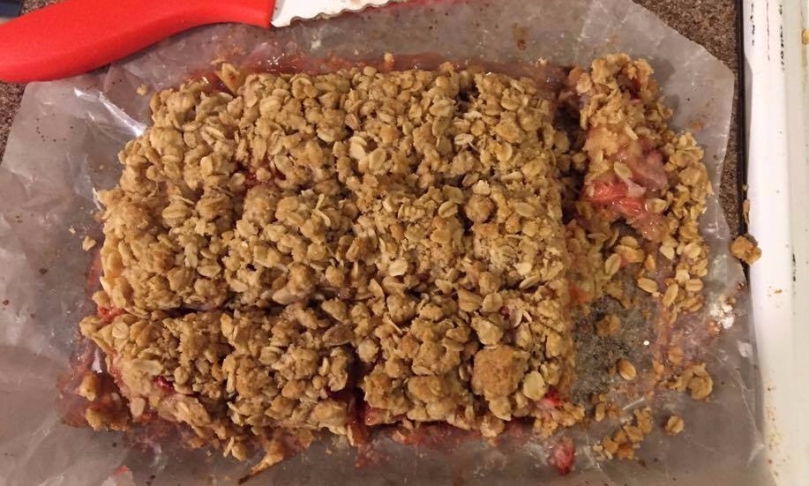
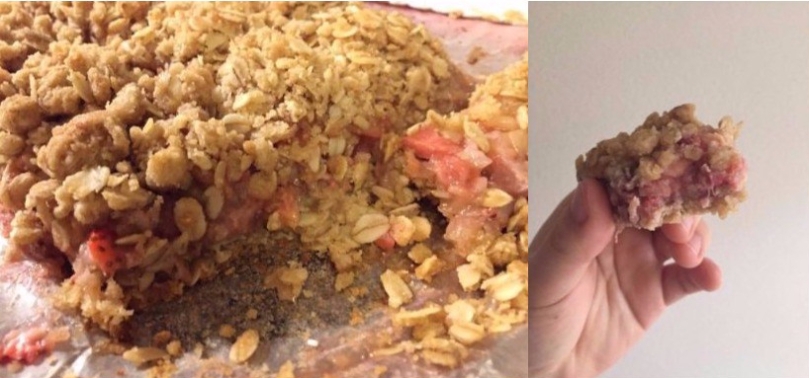
Stress baking usually happens when I have an overabundance of an ingredient on the verge of going bad, therefore making me more stressed knowing that it needs to be used in the next few days (or less!). My current dilemma was that I hadn’t polished off all my Jonagolds procured from apple picking a few weeks ago and that there were two cartons of strawberries that needed to either be eaten or remade into something else just as tasty. So, what else was there to do but combine them as a baked good? I looked to see what else I had around– of course there was flour and sugar in the pantry, but with oats, I instantly thought of fruit bars. No, not the kind you would want to consume on a long hike, but more of a dessert bar thanks to of all the butter that’s used. And that butter is worth it–these are so good! I couldn’t stop eating them, and needed to give them away to friends as soon as I could. It was this recipe that got me started. In my version, the crust was a lot thicker on top but it might have been because I used a smaller pan– what I did was take a circular 9×9-inch pan and pack the mixture into a 9×5-inch rectangle using wax paper. I also used more apple than strawberry, changing the ratios. And a sprinkle of cinnamon made things just right!

Prep: 15 minutes
Cook: 40 minutes
Yield: 12-15 bars, depending on bar size

Ingredients

  • 1 cup rolled oats
  • 3/4 cup flour
  • 1/2 cup brown sugar
  • 1/4 tsp salt
  • 7 tbsp butter
  • 1 cup finely diced apple
  • 1/2 cup finely diced strawberries
  • 1/4 tsp cinnamon
  • 1/2 tbsp cornstarch
  • 1/2 tbsp sugar
  • 1 tbsp lemon juice

Instructions

  1. Melt butter. Combine rolled oats, flour, brown sugar, and salt.
  2. Pour melted butter over oats and flour and incorporate until everything is well mixed.
  3. In a separate bowl, combine apple and strawberries and lightly mash to incorporate the two.
  4. Layer a pan with wax paper. In the prepared pan (I used 9×5 measurements), pack in half of the oat mixture. Add the apples and strawberries next, then sprinkle the cinnamon, sugar, cornstarch, and lemon juice over it.
  5. Top with the remaining oat mixture, and pat everything down to make sure it will stick together.
  6. Bake for 40 minutes, making sure the top is lightly browned. Once out of the oven, let cool completely before cutting into bars. If it seems to be falling apart, leave in the fridge for at least an hour to firm things up.
collage-2017-10-21
fruity oat goodness!

Plantain Muffins

I have never eaten plantains other than fried and prepared as a side dish in Cuban restaurants. I have never cooked or baked with one either. However, when I happened upon some in the dumpster behind a local grocery store, I had to take them and see what I could use them for. Even though plantains are comparable to bananas in appearance, their tastes are completely different when eaten straight from the peel. I bit into one, not knowing what to expect, and it reminded me of how the white part of a pomegranate smells. Texture-wise, it’s starchier. I didn’t know what to do with my formerly trashed plantains, but thought they could be incorporated into baked goods similar to bananas, still not understanding that they are completely different fruits. I made a few tweaks to this recipe, adding cinnamon and nutmeg, increasing the baking soda and baking powder, and omitting any crumb topping. It initially came out tasting more fruity yet savory than a muffin made with a banana would taste, but I liked it and wanted to share.

Prep: 5 minutes
Cook: 15-20 minutes
Yield: 20 muffins

Ingredients

  • 3 overripe plantains
  • 1/3 cup vegetable oil
  • 1/2 cup white sugar
  • 1/4 cup brown sugar
  • 1 egg
  • 1 1/2 cups flour
  • 1 1/2 tsp baking soda
  • 1 1/2 tsp baking powder
  • 1/2 tsp nutmeg
  • 1/2 tsp cinnamon
  • 1/2 tsp salt

Instructions

  1. Line a muffin pan with wrappers or grease lightly to prevent sticking.
  2. Mash plantains. Add vegetable oil, white and brown sugar, and egg. Mix until everything is well-combined.
  3. In a separate bowl, combine flour, baking soda, baking powder, nutmeg, cinnamon, and salt.
  4. Fold flour mixture into plantain mixture until it is just combined.
  5. Preheat oven to 375°F.
  6. Spoon batter into the muffin pan so it fills 2/3 of each cup.
  7. Bake for 15-20 minutes, or until edges are lightly browned and an inserted knife or toothpick comes out clean.
22627491_1495920753849200_1794763519_n
Fluffy and moist!

No-Fuss Farmers Cheese

I like being adventurous in the kitchen, but I never get too adventurous when trying a new recipe for the first time on my own. Making my own cheese, for example, seemed like an interesting DIY project but looked like it required a lot of time and tools that I didn’t have. So when I recently stumbled upon a cookbook in the library titled One-Hour Cheese, I had to check it out because it made cheesemaking seem doable. The book, by Claudia Lucero, includes a good amount of beginner recipes rated easy to easiest and is very friendly in tone, even including a section for troubleshooting. Without cheesecloth, a thermometer, or any rennet tablets, I was still able to try the recipe for a “directly acidified farmer-style cheese” that she includes in the introduction. This cheese is very mild in taste but reminiscent of ricotta in texture. I started out with a small quantity of ingredients, halving the amount the Lucero had written for, but it turned out nicely regardless. I also used lemon juice as my acid of choice, but white vinegar would work as well. You do need a colander or strainer of some sort that will retain small solids.

This simple cheesemaking experiment felt more like a science project than cooking, but luckily everything was edible! What I wasn’t expecting was the amount of whey that occurred as a byproduct. Because whey has some important proteins and I don’t like to waste, I probably will use it to cook grains on a later day, but there are plenty of creative recipes that use whey you can find online.

Prep: 1 min
Cook: 20 mins
Yield: half a cup of cheese, enough to be shared between two people with some bread

collage-2017-10-04 (1)
cheese in the colander and the resulting curds vs whey

Ingredients

  • 2 cups whole milk
  • 1 tbsp lemon juice
  • salt and pepper for seasoning

Instructions

  1. Place colander over bowl.
  2. In a small saucepan, heat the milk on medium. Stir occasionally to make sure the milk does not scorch on the bottom.
  3. When it starts to bubble from the bottom and the on the sides, add the lemon juice and stir, reducing heat to low.
  4. Stir on low for a few minutes, until the milk is completely separated.
  5. Start with spooning the curds onto the colander, removing as much of the whey as possible.
  6. When most of the curds have been spooned out of the saucepan, slowly pour the remaining whey mixture through the colander to catch the remaining bits. Let rest for a few minutes.
  7. Transfer curds to a bowl and stir in salt and pepper.

Spread this cheese on an some bread or an English muffin and try with honey and pears, as pictured in the photo!