Key Lime Pie Ice Cream

I recently became the owner of an ice cream maker. A close friend decided to move out-of-state (sad) and needed to get rid of some inventory (less sad). Since he was not interested in bringing small appliances, I took it off his hands on his last night in Chicago. A few days later, I was searching for ideas on what to make for my first machine-made ice cream and came across the concept of key lime pie ice cream. Though it sounded complex, it didn’t look daunting at all– there were only a few ingredients listed on recipes such as the ones here and here. It took less than five minutes to prepare, and even though it was simple it was a tad bit more interesting than using the chocolate or vanilla recipes that the instruction manual provided. I also had some leftover shortbread from a previous baking session, so I added that in for a “pie crust” feeling. Bottom line: this is an uncomplicated recipe that was taste-tested and heartily approved by my friends.

Prep: 3 minutes
“Cook”: 1 hour – half an hour to refrigerate, half an hour in the ice cream maker
Yield: about one quart of ice cream

Ingredients

  • 1 cup whole milk
  • 1 cup heavy whipping cream
  • 1 14 oz can sweetened condensed milk
  • 3/4 cup lime juice
  • 1/2 cup shortbread, graham cracker, or sugar cookie pieces, roughly crushed

Instructions

  1. Combine the whole milk, heavy whipping cream, sweetened condensed milk, and lime juice. Mix until everything is well-combined.
  2. Let the mixture chill in the fridge for about half an hour, or until it gets cold.
  3. Add the mixture into the ice cream maker!
  4. Once it has been churned for about half an hour or is at the right consistency, stop the machine and scoop the ice cream out into a different container.
  5. Hand-mix in the graham cracker or cookie pieces.
  6. Continue to freeze once the mixture is out of the ice cream maker.

Ginger Milk Pudding

One of my friends has of been late going through a pudding making phase. She’s shown me quite a few ideas of things we could try together, but a few days ago we settled on attempting ginger milk pudding. Sugar, ginger juice, and milk are all the ingredients one needs for the traditional Cantonese dessert. Our take included a lot more ingredients and was melded with American tradition since we had some technical difficulties. On an afternoon filled with trial and error, we finally found a combination that worked. The first time when we used the initial three ingredients, it didn’t set. Maybe the milk wasn’t hot enough? Neither of us had a kitchen thermometer, so we couldn’t tell. Luckily, we were able to thicken it with cornstarch. And while that turned our seeming failure into a success, I have a feeling that the consistency of this pudding is probably very different from the original kind because of that additional ingredient. Regardless, we thought it was tasty and I wanted to share the fruits of our labor.

Prep: 20 minutes
Cook: 20 minutes
Yield: 10 servings

Ingredients

  • 1/2 pound fresh ginger
  • 6 tablespoons cornstarch
  • 1/4 teaspoon salt
  • 3/4 cup sugar
  • 4 cups milk
  • 1/4 cup coconut milk
  • 1 1/2 teaspoons vanilla
  • dash of cinnamon and nutmeg

Instructions

To prepare the ginger:

  1. Peel the ginger –using a spoon for this works so well you’ll never want to use another technique again.
  2. Roughly chop and add the ginger to a food processer so it gets broken down into smaller pieces.
  3. Juice the pieces though a hand-held squeezer, but save the pulp.

For the pudding:

  1. In one bowl, mix together cornstarch, salt, sugar, and one cup of milk.
  2. Prepare a double boiler (a heat-safe bowl that fits snugly over a pot of boiling water).
  3. While the double boiler is heating up, combine three cups milk, the ginger juice, and the pulp in a saucepan. Put it over medium-high heat to scald the mixture.
  4. Once it scalds, turn the heat to low. Slowly mix in the bowl of cornstarch and milk into the saucepan of scalded milk and ginger, stirring constantly.
  5. Strain the mixture into the bowl over the double boiler and let it cook for 10 minutes, still stirring occasionally.
  6. Add the vanilla, coconut milk, and a dash of cinnamon and nutmeg. Make sure everything is once again thoroughly incorporated.
  7. Once the pudding is finished cooking (it should be viscous) pour it into desired bowls or molds and press plastic wrap on the top so it does not develop a film. Chill for an hour.
  8. If you want more ginger flavor, you can add more juice or even ginger powder, but be sure to not overdo it or else the pudding will be very spicy!

Shortbread Cookies & Limoncello Icing

Happy New Year! The holidays have been pretty disruptive to my schedule, but in a good way. There’s friends and family to catch up with and warm weather to bask in when I go back to California. Now that I’m back in Chicago and bracing myself against 3° temperatures, it’s time to get back on track. I know January is all about focusing on resolutions to eat healthier, but what about embracing moderation– having your dessert and enjoying it too? Extremes are no fun. So, whenever I go to a potluck or bring goodies to friends, I always indulge and make something on the sweeter side.

For this year’s festivities, I made plain shortbread cookies and coated them with a zesty limoncello icing to amp up their tastiness (actual lemon zest optional). In the process, I learned that the “short” in shortbread does not refer to size but rather structure– in “short” baked goods, there is a large amount of fat in the dough, making it quite rich and giving the baked good a crumbly, melt-in-your-mouth texture. My original inspiration for making these cookies came from here. I added more sugar, but if you want a plainer cookie, use the half cup sugar instead of three-fourths cup sugar for two cups of flour.

Prep: 10 minutes
Cook: 12-14 minutes
Yield: about seventy 2×3/4 half inch pieces

Ingredients

For the cookies:

  • 1 cup butter, softened
  • 3/4 cup granulated white sugar
  • 1 1/2 tsp vanilla extract
  • 2 cups flour

For the icing:

  • 1 cup powdered sugar
  • 3 tsp limoncello
  • 2 tsp lemon juice

Instructions

  1. Cream butter and sugar. Stir in vanilla, then flour, adding in one half cup at a time. The dough will be very sandy! Don’t fret, when the butter melts in the oven, the dough comes together to form a non-sandy cookie.
  2. Preheat the oven to 350°F.
  3. As the oven is preheating, line a baking sheet with parchment paper. Mold the dough so it lies as a flat rectangle with a half-inch thickness.Before.png
  4. Bake the cookie dough for about 12 minutes, or until lightly browned on the edges.
  5. After the dough is out and left to cool for a few minutes, cut the dough into small (or however large you want them) rectangles.
  6. For the icing, first combine the limoncello and lemon juice.
  7. Slowly beat in the powdered sugar to create a smooth consistency.
  8. Spoon half a teaspoon’s worth of icing onto each cookie. Once that dries, spoon on a second layer.


Kimchi & Rice Miso Soup

It has finally gotten to that inconceivably cold but apposite temperature for December in Chicago. The numbers drop below freezing (but thankfully remain in the double digits on the Fahrenheit scale) and the concomitant wind chill makes me never want to go outside. I’m grateful that soup allows me to could curl up with something warm and easy to consume. I can warm my hands on the bowl and my face with the vapor wafting from my freshly cooked meal.

Traditional miso soup has an additional component that I did not incorporate– dashi. However, I do not have dashi powder nor did I get the kombu and bonito flakes necessary to prepare my own. I would recommend using that as well, since it is a simple combination that adds extra flavor to the broth. The tofu and kimchi soften up, and even though the kimchi loses most of its spiciness to the broth, the pickled taste does not part from the cabbage. If you need more heat to combat this winter weather feel free to add some hot chili oil!

Prep: 3 minutes
Cook: 12 minutes
Yield: 1 serving

Ingredients

  • 1/4 cup uncooked rice
  • 2/3 block of tofu, diced into 1/2-inch sized blocks
  • 3 cloves of garlic, minced
  • 1/4 cup kimchi
  • 1 egg
  • 1 tbsp miso paste
  • 1/4 tsp sesame oil
  • 2 tbsp rehydrated wakame or 1 cup spinach

Instructions

  1. Pour 2 cups of water and the 1/4 cup rice into a small pot and put on high heat.
  2. Once the water is boiling, add the garlic, tofu, kimchi, and egg.
  3. Turn the heat to medium once the egg is mostly cooked and allow to simmer for a few minutes. Stir in the miso paste and sesame oil.
  4. Throw in the wakame or spinach and let simmer for a minute or so more, until the spinach is wilted and the rice is soft enough to eat.

Three Ingredient Peanut Butter Yogurt

When I first mixed my peanut powder into my breakfast yogurt, I was pleasantly surprised. Even though most of the oil had been pressed out, the powder itself really did capture the taste of peanuts. This combo is very similar to the chocolate almond milk because it’s a three ingredient recipe that involves a powdered food product, something already prepared, and honey. As long as you have these things on hand, it’s easy to make whenever you crave it. I’ve tried the powdered peanut and honey combination in both plain dairy and soy yogurts, and both yield a smooth peanut-y taste as long as you beat out all the lumps. For a chocolate peanut butter yogurt, I recommend getting a powdered peanut product that already has the chocolate mixed in, since any variety of cocoa powder that I’ve added in does not combine well, and ends up being tasteless or not complementing the peanut flavor at all. And of course, as per individual tastes, feel free to incorporate as much or as little honey as you desire.

Prep: 1 minute
Cook: 0 minutes
Yield: 1 serving

Ingredients

  • 2 tbsp powdered peanut butter
  • 1 tsp honey (more or less, depending on taste preferences)
  • 1/2 cup plain yogurt
  • ideas for add-ins: slices of banana, chocolate chips, jam

Instructions

  1. Add the yogurt, powdered peanut butter, and honey into the bowl you’re going to eat from, and mix well to fully combine. Make sure there are no lumps of powdered peanut butter or honey remaining.
  2. Top with whatever you like to eat with peanut butter!

Three Ingredient Chocolate Almond Milk

Who can believe that 2017 is almost over? Not me– I’ve never been good at adjusting to the end of the year. Now that everyone is in a Christmas countdown mode, Thanksgiving seems like a distant memory even though it happened less than two weeks ago. I’ve always found it hard to transition into the new year, especially when there are so many hopes pinned to the future. Maybe next year I will stick to my resolutions, or maybe it’s the year that we actually enact effective climate change legislation. While the first is something I am fully in control of, the latter desire feels mostly out of my control. When things feel too overwhelming, I’ve been making this chocolate milk to calm down. I always have these three ingredients on hand, and the act of making myself a simple drink soothes me. I just put everything into the cup I want to use, so I make even less of a mess. If you make your own almond milk or prefer a different kind, just make sure it’s unsweetened.

Prep: 3 minutes
Cook: 0 minutes
Yield: 1 serving

Ingredients

  • 1 tbsp cocoa powder
  • 1/2 tbsp honey
  • 1 cup unsweetened almond milk

Instructions

  1. Add the cocoa powder and honey into the cup you’re going to drink from, and stir to combine. The cocoa powder and honey will not be fully combined, but this helps to get rid of the cocoa powder lumps.
  2. Add one tablespoon of the milk and milk until a cocoa-honey paste is formed.
  3. Pour in the rest of the milk and mix well.

Sweet Potato Black Bean Tacos

Sweet potatoes are one of my favorite root vegetables. I crave them, appreciate their versatility and have used them in both sweet and savory dishes. Even simply roasting and eating them without any extra additions is delectable to me. Unsurprisingly, sweet potatoes and black beans work well together. They are both hearty and somewhat neutral flavors. Aside from their usual manifestations, I’ve used black beans plenty of times to make brownies that I cannot help but devour mere minutes out of the oven, as well as vegetarian chilis and soups. For these tacos, I mashed the sweet potatoes so I didn’t have to worry about them falling out of my tortillas, but the black beans weren’t as compliant. Regardless, I found these tacos to be very tasty!

Prep: 10 minutes
Cook: 15 minutes
Yield: 2 servings

Ingredients

  • 1 large sweet potato, diced
  • 2 tbsp olive oil
  • 1/4 tsp cinnamon
  • Dash of salt and black pepper
  • 1 green bell pepper
  • 1 medium onion
  • 1 plum tomato
  • 1 15 oz can black beans
  • 1/2 tsp garlic powder
  • 1/2 tsp cumin
  • 1/4 tsp paprika
  • 1/4 tsp cayenne
  • 4 corn tortillas
  • 2 tbsp cheese such as Cotija, feta, or Parmesan for topping

Instructions

  1. Heat 1 tbsp olive oil on medium heat in a skillet. Add diced sweet potato and cook for a few minutes. Add cinnamon and a dash of salt and pepper.
  2.  Lower heat and cover the skillet, stirring every few minutes. If the sweet potatoes are looking a little dry, add 1-2 tablespoons of water and continue to cook until sweet potatoes are soft and the water has evaporated.
  3. While the sweet potato is cooking, heat the other tbsp olive oil in a second pan. Roughly chop the onion and green bell pepper.
  4. Once the second pan is hot, add the onion and bell pepper and cook until the edges start to become charred. Add the tomato, as well as the garlic powder, paprika, cumin, and cayenne. Sprinkle in a dash of salt and pepper and stir.
  5. When the tomato liquid starts to reduce, add the black beans and cook until everything is heated.
  6. Heat tortillas in a pan, toaster oven, or on a burner.
  7. For assembly: mash the sweet potatoes and spread on the tortillas. Spoon the black bean mixture onto the tortillas and top with cheese.


Treat Yourself Avocado Toast

A good friend of mine recently started working at an excellent bakery, and whenever he helps close shop he gets to take home any of the uneaten treats! This has been great for me because when I see him, there’s bread that needs to be taken off his hands or cookies that need to be eaten ASAP. He introduced me to one of my new favorite dessert-like snacks– the pumpkin spiced Rice Krispie treat. The flavor and texture combination is something that I never would have thought of but have enjoyed immensely as of late. Also thanks to him, my dinners have remained uncomplicated by being based on a loaf of rustic sourdough that I keep in the freezer. I toast a few slices here and there and they taste just as fresh and robust as they would have the first day I got them. Because the bread is of such a good quality, not much needs to be added to make it into a superb meal. Enter: avocado toast. Great breakfast item, but also a quick dinner, easily “spiced up” with a few more veggies and seasonings. By now, my toast has become more of an open-faced sandwich, but I make it when I’m hungry and have no capacity to patiently wait for food.

Prep: 5 minutes
Cook: 15 minutes
Yield: dinner for one (but can easily be made for more)

Ingredients

  • 1 slice of your favorite hearty bread
  • 1/2 ripe avocado
  • 5-6 button mushrooms
  • 2 cloves of garlic
  • 2 tsp olive oil
  • 1/2 beefsteak tomato, or equivalent amount of different tomato
  • 1 egg
  • Seasoning options: black pepper, red pepper flakes, Parmesan cheese OR furikake (Japanese rice seasoning) OR nutritional yeast (vegan cheese substitute)

Instructions

  1. Dice the mushrooms and mince the garlic. Add them to a pan with 1 tsp olive oil on medium heat and stir so everything is evenly coated.
  2. Meanwhile, toast the bread.
  3. Mash and spread the avocado onto the toast when it’s out of the oven.
  4. When the mushrooms are cooked down and the liquid has evaporated, remove them from the pan but keep the heat on.
  5. Add the other tsp of olive oil, and when it’s hot gently crack and slip the egg into the pan.
  6. Once the egg starts to fry, cover but make sure to check on it so the yolk does not harden. Remove from heat once the whites have set.
  7. Top the avocado toast with the tomato slices, garlicky mushrooms, and fried egg. Sprinkle on desired seasonings. This time, I used a combination of black pepper, red pepper flakes, and shredded Parmesan.

Beer Bread

This is another magical recipe in my opinion. It’s the simplest thing to make and comes out very well, even if you use a cheap beer. There is no yeast you need to activate, no special kneading technique employed, and the recipe has a total of six easy-to-find ingredients on the list (if you’re 21 or older, that is). After a friend tried it at a party, he drizzled olive oil, balsamic, and herbs in a dish, and with our combined efforts it made a great party snack! All of the recipes online looked pretty similar, but I went with this one and used the commentators’ suggestions for improvement. The original calls for double the amount of butter and sugar, but using those measurements would have made it oddly sweet and too greasy. It is a bit dense, so remember to sift the flour beforehand so it’s not too tough! If you don’t have a fancy sifter, spooning it into the bowl works.

Prep: 5 minutes
Cook: 50-55 minutes
Yield: one 9×5 inch loaf of bread

Ingredients

  • 3 cups flour
  • 3 tsp baking powder
  • 1 1/2 tsp salt
  • 2 tbsp sugar
  • 12 oz (standard can or bottle size) of beer; a cheap, light beer or cider recommended
  • 1/4 cup butter

Instructions

  1. Preheat oven to 375°F
  2. Whisk together flour, baking powder, salt, and sugar.
  3. Add the beer and mix with a spatula until just combined.
  4. Transfer the dough to a lightly greased loaf pan and pour melted butter over it, making sure to get in the crevices.
  5. Bake for 50-55 minutes, and let cool for about 10 minutes once out of the oven.

Apple Strawberry Oat Bars

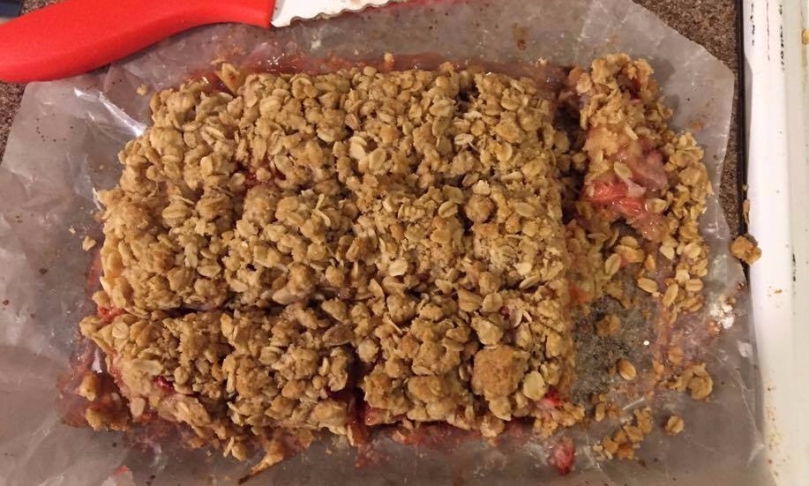
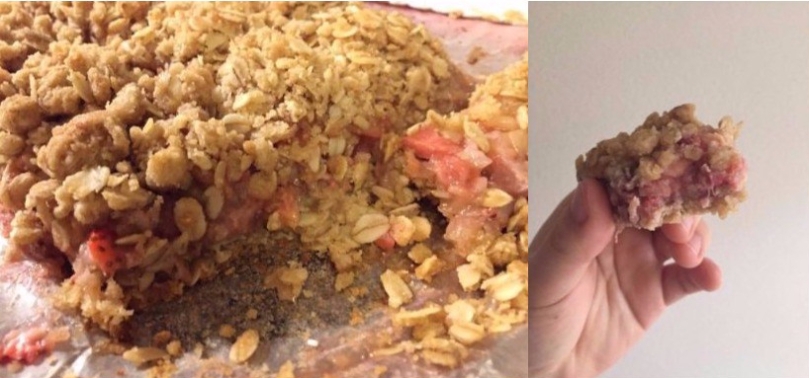
Stress baking usually happens when I have an overabundance of an ingredient on the verge of going bad, therefore making me more stressed knowing that it needs to be used in the next few days (or less!). My current dilemma was that I hadn’t polished off all my Jonagolds procured from apple picking a few weeks ago and that there were two cartons of strawberries that needed to either be eaten or remade into something else just as tasty. So, what else was there to do but combine them as a baked good? I looked to see what else I had around– of course there was flour and sugar in the pantry, but with oats, I instantly thought of fruit bars. No, not the kind you would want to consume on a long hike, but more of a dessert bar thanks to of all the butter that’s used. And that butter is worth it–these are so good! I couldn’t stop eating them, and needed to give them away to friends as soon as I could. It was this recipe that got me started. In my version, the crust was a lot thicker on top but it might have been because I used a smaller pan– what I did was take a circular 9×9-inch pan and pack the mixture into a 9×5-inch rectangle using wax paper. I also used more apple than strawberry, changing the ratios. And a sprinkle of cinnamon made things just right!

Prep: 15 minutes
Cook: 40 minutes
Yield: 12-15 bars, depending on bar size

Ingredients

  • 1 cup rolled oats
  • 3/4 cup flour
  • 1/2 cup brown sugar
  • 1/4 tsp salt
  • 7 tbsp butter
  • 1 cup finely diced apple
  • 1/2 cup finely diced strawberries
  • 1/4 tsp cinnamon
  • 1/2 tbsp cornstarch
  • 1/2 tbsp sugar
  • 1 tbsp lemon juice

Instructions

  1. Melt butter. Combine rolled oats, flour, brown sugar, and salt.
  2. Pour melted butter over oats and flour and incorporate until everything is well mixed.
  3. In a separate bowl, combine apple and strawberries and lightly mash to incorporate the two.
  4. Layer a pan with wax paper. In the prepared pan (I used 9×5 measurements), pack in half of the oat mixture. Add the apples and strawberries next, then sprinkle the cinnamon, sugar, cornstarch, and lemon juice over it.
  5. Top with the remaining oat mixture, and pat everything down to make sure it will stick together.
  6. Bake for 40 minutes, making sure the top is lightly browned. Once out of the oven, let cool completely before cutting into bars. If it seems to be falling apart, leave in the fridge for at least an hour to firm things up.
collage-2017-10-21
fruity oat goodness!